
Saad Abdul Aziz A. Al-Ani
Faculty of Information Technology, Amman Al-Ahliyya University, P.O. Box 975 Swieleh, Amman, Jordan
Information Technology Journal
Year: 2005 | Volume: 4 | Issue: 2 | Page No.: 163-172


ABSTRACT
One of the problems that face the user is how to deal with images that contain a huge number of curves. The appearance of these curves in thick lines makes the recognizing and the counting of these curves difficult. Also storing the data of these curves may need a large storage spaces. So we use thinning, where thinning is used now as a basic step in analyzing the shape of lines and curves in digital images. This research offers a method for following the curves from the start point till the end, giving a different color to each curve and during the passing over the pixels of the curve, a thinning is made by erasing the unnecessary pixels, keeping all the characteristics of the curve with a minimum number of pixels. We could recognize the number of curves by the number of colors appear in the final image. All the images used in this research are in black and white.
PDF Abstract XML References Citation
How to cite this article
Saad Abdul Aziz A. Al-Ani, 2005. Recognizing and Thinning the Curves of Digital Images. Information Technology Journal, 4: 163-172.
DOI: 10.3923/itj.2005.163.172
URL: https://scialert.net/abstract/?doi=itj.2005.163.172
DOI: 10.3923/itj.2005.163.172
URL: https://scialert.net/abstract/?doi=itj.2005.163.172
INTRODUCTION
When digital technology is used to capture, store, modify and view photographic images, the images must first be converted to a set of numbers in a process called digitalization or scanning. Since computers are very good in storing and manipulating numbers, once the image has been digitalized, the computer can be used to examine, alter, display, transmit, print and archive your photographs in an incredible variety of ways. This digital file is stored in computer like any other file. Image files tend to be larger than text files, since images require more data to represent visual information. File size (usually measured in megabyte, or MB) indicates the amount of data required to capture a specific image to a given level of resolution[1].
Images are made up of lines, rectangles, ellipses, arcs, circles and curves, which may be connected or disconnected[2]. To recognize the image we need to recognize each line and curve contained in that image and to store the image we, in fact, store each simple unit of that image.
THE PROBLEM
In some applications we don’t need to store the whole individual units of the image, indeed we need the outlines of the image, that mean we need the basic information about the lines and curves contained in that image where these basic information determines exactly what the image is. For example in applications of radars they need to know whether the incoming object is a plain, a rocket, or a falling star so they don’t need the details of that object, another application is the recognition of Arabic and English letters where the letter is the same if it is stored with a font size (10) or a font size (24).
The problem is that,we need a method for storing the image in a manner such that we store exactly the basic needed information and that will off course minimize the storage space needed to store the image as well as it will increase the speed of retrieving the image. This can be achieved by following the curves of the image and thinning them, which makes the recognition operation relatively simple[3].
THE PROPOSED METHOD
The suggested method is a collection of a recognition algorithm to recognize the lines and curves of an image as well as a thinning algorithm to minimize the stored data used to identify the image.
Thinning and recognition algorithm: To recognize each individual line and curve of an image we will scan the whole image and following each line and curve in an operation known as the follow-through operation.
In this operation each line and curve in the image will be given a different color than the others, these colors give a recognition of the components of the image and they also give the number of curves in the image, which in turn gives a component of the features of the original image.
In parallel to the follow-through operation, a thinning is made to the image by copying only the points we pass over during the following-through (only the points that define as a current point) to get in the output thinning file, an image which is the same as the original but with thinned curves and lines[4].The whole operation is done by the following sequence:
| • | Convert the picture to a digital image with two colors (black and white). |
| • | Apply the follow-through operation on the digital image(which has both the recognition and thinning algorithms). |
| • | As a result of the follow-through operation we will get two output files,the first one is a thinned image and the second is a recognized image file. |
The algorithm of the follow-through operation: The following steps represent the algorithm used for the follow-through operation of an image:
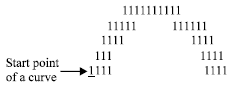
Step one: Find the start point of a curve, consider the start point as a current point.
 |
| i. | Change the color of the current point that has found to a new color with all the connected neighbors points in the same row. |
| ii. | Copy the current point to the thinning output file at the same position of the original point. |
In case of the succeeding point far a few points of the current point, copy with the current point all the points that we passed from the current to the succeeding point.
Step two: Find the upper succeeding point on one of the following directions (Fig. 1a-d):
| • | Find the exact upper succeeding point (a). |
| • | Find the right upper succeeding point (b). |
| • | Find the left upper succeeding point (c). |
| • | If no point was found in the previous directions then we will look for the succeeding point either in the next most left upper point or in the next most right upper point to the current point (d). |
When the succeeding point is found it will be considered as a current point and look for the next succeeding point.
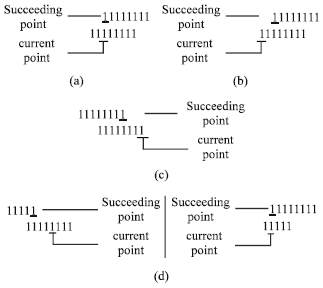 | |
| Fig. 1: | Different types of succeeding points |
Re-execute step (i) and (ii) for each current point.
Step three: Find the upper top of a curve.
If we reach a point where no upper succeeding point is found in any of the directions of step two, then we either reach the top of the curve or the end of the curve.
If we reach the top of the curve then (Fig. 2a and b):
| • | Change the color of the current point and all the points at the same row. |
| • | Copy the current point and all points in the same row to the thinning output image file |
| • | Find the lower connected point that has the original color. |
| • | Consider it as current point, Re-execute step (i) and (ii) |
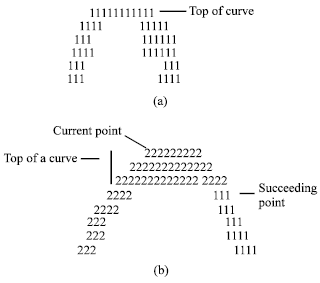 | |
| Fig. 2: | Find succeeding point for the upper top of the curve |
Step four: Find the lower succeeding point depending on one of the following directions:
| • | Find exact lower succeeding point. |
| • | Find the right succeeding point down the current point. |
| • | Find the left succeeding point down the current point. |
| • | If no point was found in the previous directions then we will look for the succeeding point either in the next most left point down to the current point or in the next most right point down to the current point. |
When the succeeding point is found, consider the new point as a current point. Re-execute step (i) and (ii).
Step five: Find the lower top
When we reach a point where no lower succeeding point is found in any of the directions in step four, then we either reach the down top of the curve or end of the curve.
If we reach a lower top then Re-execute steps 1, 2, 3, 4 of step three, but here in point (3) we will look for a connected point with the original color in the upper direction.
Step sex: Find the end of a curve
When we reach one of the boundaries of the image (upper, lower, left or right boundary) or when we reach a point where no succeeding point is found in any direction, we consider the current point as end point of the curve (Fig. 3).
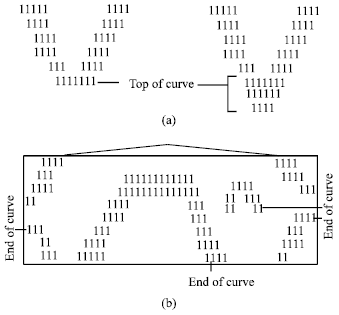 | |
| Fig. 3: | Find the succeeding point for a) lower top of the curve. b) end point of the curve |
Step seven: Find a new start point for a new curve.
Apply all the previous steps of the algorithm on the new curve.
By applying the previous algorithm on the image we get as a result, a converted image where each line or curve in the original image is represented in the new image with a different new color but still has the same shape and thickness. As a second result we get a thinning image in the thinning output image file.
IMPLEMENTATION
The following figures processed with the whole steps of recognition and thinning.
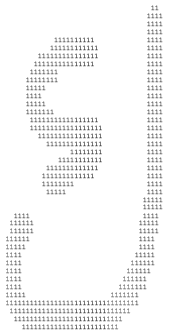
The sample images contain Arabic letters, English letter and a funny face, where these images contain different types of lines and curves.
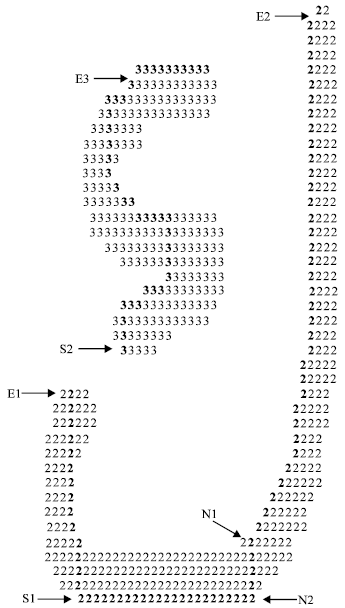
Figure 4B is the digital image of Fig. 4A where we assume that the black color is (1) and white is (0) which is removed for clarity.
 | |
| Fig. 4A: | Original image |
 | |
| Fig. 4B: | Digitalized image |
In Fig. 4C, we start scanning the image from the left bottom corner to upward.
 | |
| Fig. 4C: | Scanned image |
The first point that is found (S1) will be considered as a start point of the first curve(it will be considered as a current point), the succeeding point is upper the start point directly. We will continue upward following the algorithm to find the succeeding points until we reach the end (E1) of the first curve. Again we will look for a new curve,we reach the point (N1) which is connected to first curve but still has the original color, so we consider it as a continuing of the first curve and change it to the same color of the first curve, when we find (N1) we look for the path between (N1) and (N2) which is down below (N1) and in the first row of the first curve, all the points between the start point and (N2) with all the point between (N2) and (N1) will be copied to the output thinning file at the same position of the original points. Again we will follow the algorithm until we reach the second end (E2) of the first curve.
 | |
| Fig. 4D: | Recognized image, 2 different curves |
 | |
| Fig. 4E: | Thinned image |
Now we will look for a new start point, we will find (S2) which is not connected to any recognized curve so,we change the color to a new color and continue with the algorithm until we reach the end of the second curve (E3). The algorithm will stop when no new curve is found. the points that will be copied to the thinning file are in bold font.
The result will be a thinning image as in Fig. 4E and also a recognized image as in Fig. 4D where we recognize two curves depending on the number of different colors in the new image. We can apply any further operation on these curves since all the points of curves are known.
ANOTHER EXAMPLES
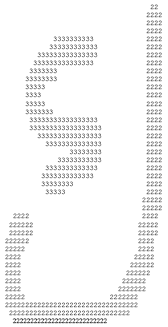
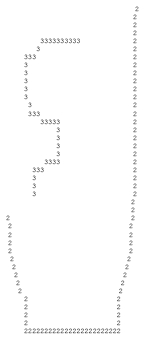
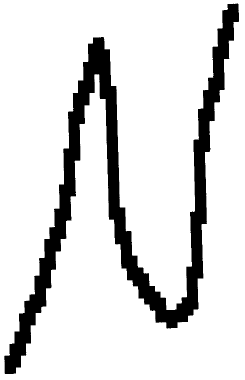
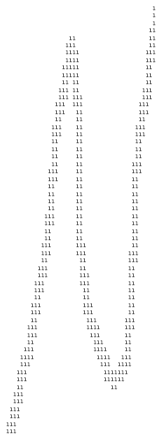
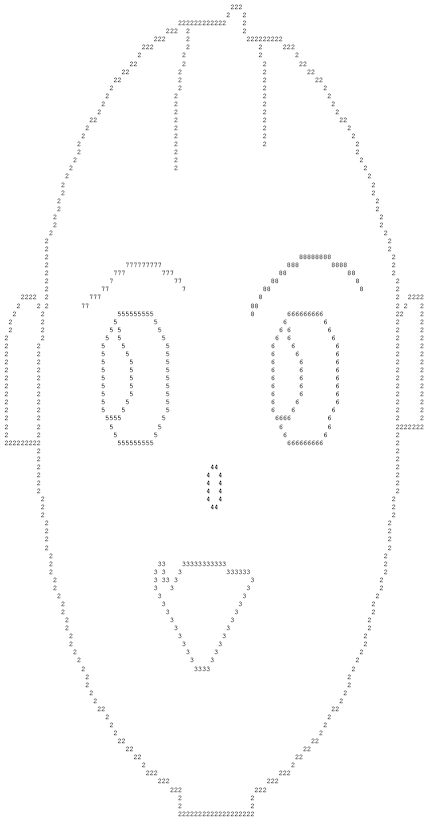
By applying the algorithm on the images in Fig. 5A (Arabic letter), Fig. 6A (English letter) and Fig. 7A (face), we get first the digitalized images as in Fig. 5B, 6B and 7B.
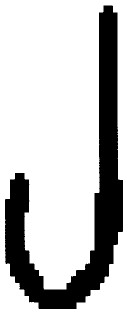 | |
| Fig. 5A: | Original image |
 | |
| Fig. 5B: | Digitalized image |
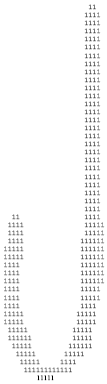
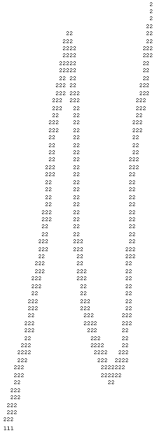
 | |
| Fig. 5C: | Recognized image, 1 curve |
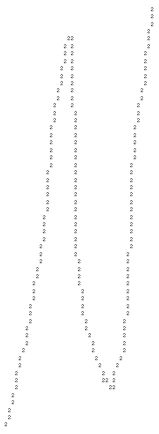
 | |
| Fig. 5D: | Thinned image |
The second step is the follow-through operation in which we get the recognized images(Fig. 5C, 6C and 7C), the number of curves is equal to the number of colors.
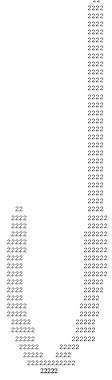
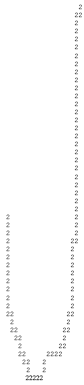
 | |
| Fig. 6A: | Original image |
 | |
| Fig. 6B: | Digitalized image |
 | |
| Fig. 6C: | Recognized image, 1 curve |
 | |
| Fig. 6D: | Thinned image |
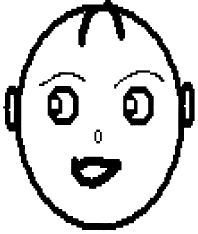 | |
| Fig. 7A: | Origninal image |
 | |
| Fig. 7B: | Digitalized image |
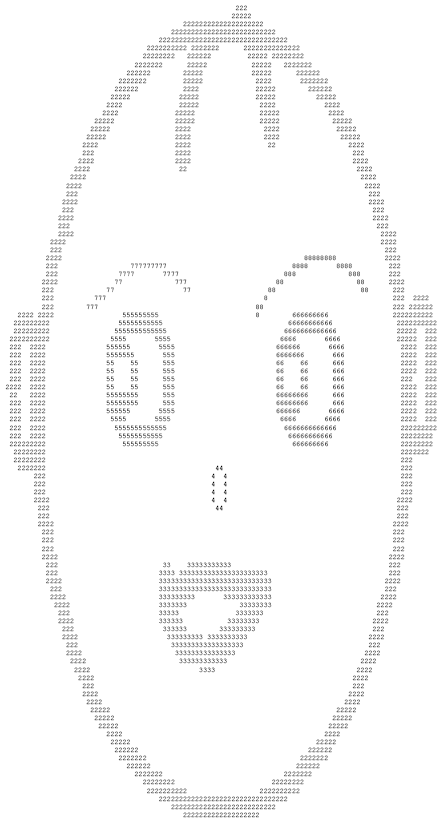 | |
| Fig. 7C: | Recognized image, 8 different curves |
 | |
| Fig. 7D: | Thinned image |
At the same time we get the thinned images as in Fig. 5D, 6D and 7D, which still have the same shapes of the images but with the minimum possible pixels.
CONCLUSIONS
Any image is a collection of curves and lines, so to recognize the image we have to recognize these curves and lines:
| 1. | Since each pixel in the curve is recognized, we could use these pixels in hiding information or studying the characteristic of curves (eye or mouth in a face). |
| 2. | Any particular change in the image is possible, such as removing a curve from the picture or part of it, changing the shape of the curve, or any other changes. |
| 3. | Recognizing whether the curves are concave up or concave down, making a suitable thinning on the top of the curve, which enables any farther operations on theses curves (such in sign waves). |
| 4. | We could use the suggested methods in recognizing, for example the hand written or printed words and the type of fingerprint. |