
Jauhar Ali
College of Engineering and Computer Science, Abu Dhabi University, Abu Dhabi, UAE
Information Technology Journal
Year: 2011 | Volume: 10 | Issue: 3 | Page No.: 485-498


ABSTRACT
In this study, we design and implement a visualization tool that makes it easier for students to learn object-oriented data structures and related design patterns. A data structure is a core course in almost all Computing programs. The majority of textbooks and courses on data structures these days are based on Object-Oriented Programming (OOP). In many cases, they base their pedagogy on software design patterns. However, because of heavy reliance on abstraction, they place greater demands on learners. Our tool allows students to see and interact with a visual representation of object structures and patterns used in their programs.
PDF Abstract XML References Citation
Received: August 25, 2010;
Accepted: September 28, 2010;
Published: December 01, 2010
How to cite this article
Jauhar Ali, 2011. Object Visualization Support for Learning Data Structures. Information Technology Journal, 10: 485-498.
DOI: 10.3923/itj.2011.485.498
URL: https://scialert.net/abstract/?doi=itj.2011.485.498
DOI: 10.3923/itj.2011.485.498
URL: https://scialert.net/abstract/?doi=itj.2011.485.498
INTRODUCTION
A course on Data Structures is one of the introductory courses in a typical Computer Science program. It is recommended, by the recent joint ACM/IEEE-CS computing curricula task force (ACM/IEEE-CS, 2001), to be the third in a three-course sequence on introductory computing courses using the popular programming-first, object-first implementation strategy. A thorough understanding of the Data Structures course is necessary as it facilitates and enhances understanding of intermediate and advanced courses in a computing curriculum.
Object-oriented programming is gaining increasing acceptance in both academia and industry because of its suitability for modeling computation as a community of interacting objects. Consequently, object-oriented programming languages are arguably the most widely used languages for implementing introductory courses in computing. A downside of these languages is that they are often complex for beginning programmers. A lot of research is being carried out in the Computer Science education community targeted at helping students understand basic object-oriented concepts and programming (Naps et al., 2000; Bravo et al., 2003; Gomes and Mendes, 2001; Stasko et al., 1993; Hamer, 2004a, b).
Software design patterns capture recurring patterns found in software designs. They provide templates that software engineers identify, document and implement for use in various software development situations. Object-oriented Design Patterns enable code re-use beyond that possible by class inheritance. For example, with object-oriented design patterns, code can be shared among classes that are not related by an inheritance hierarchy.
The worthy price paid in exchange of the above advantages is that students usually find it challenging to understand and master the abstraction associated with the design patterns and polymorphic code. Our experiences teaching data structures course over the past eight years reveals that students typically struggle with the complexity of design patterns and polymorphic code until the first major examination.
In this study, we developed a visualization tool that makes it easier for students to understand object oriented programming concepts and data structures in an active, do-it-yourself manner with the help of visual media. Using the tool we create models that capture the concept and behavior of various program elements that learners can control and actively interact with. Students are able to see, visually, the effects of executing their programs thereby, we hope, uncovering the 'mystery' that seems to surround understanding and writing computer programs. One of the best things in our tool is that students can visualize the effects of semantically incorrect programs, thus helping them pinpointing their mistakes.
REQUIREMENTS ANALYSIS
We have reviewed a number of visualization tools, such as, Animal (Roling and Freisleben, 2001), Matrix (Korhonen, 2003), SICAS (Marcelino et al., 2004; Ben-Ari, 2001), OOP-Anim (Esteves and Mendes, 2004), BlueJ (Kolling et al., 2003), Jeliot (Bednarik et al., 2005) and LJV (Hamer, 2004a, b). We provide a detailed discussion on these tools in the Discussion section. Here, we summarize the problems in one or the other of these tools.
| • | The level of visualization is too detailed, which produces clutter and makes it difficult to understand |
| • | Extra code needed for visualization is inserted in the source code |
| • | Only specific algorithms and data structures are visualized |
| • | Support learning general programming only |
One of the major driving motivations for us is to develop a visualization tool suitable for learning, teaching and/or debugging data structures programs such that it is interactive, easy to use and that it has moderate implementation demands. Accordingly, we define the requirements that help us realize such a system. Following is a summarized list of requirements for the proposed tool. The term target code means user's code that is going to be visualized.
| • | The target code only needs to be compilable. This means, that semantically incorrect code can also be visualized. This will help students to find their mistakes |
| • | The tool shall not change the source of the target code. Because this may confuse users and they may think that the tool is visualizing a different code rather than the code they provided |
| • | The tool should show source code of the method being executed, method call stack and status of the heap, i.e., current active objects |
| • | The tool shall highlight the current line in the source of the target code while visualizing any change |
| • | The visualization should be simple (not cluttered) and the user should be able to interact with it |
TOOL DEVELOPMENT
To fulfill the above requirements, we believe that the proposed tool should perform two tasks: (1) Data extraction and (2) Visualization. Data extraction means to gather dynamic data from the executing target code. Dynamic data is a notification of any interesting thing that happens in the executing target code, such as a method is called, or a variable is updated. In response to any such notification, the tool should produce/update the visualization.
Dynamic data extraction: Here, first we discuss technologies for extracting dynamic data from Java programs. Then, we explain the approach we use for data extraction.
Dynamic data extraction technologies: The Java Reflection package java.lang.reflect (Sun Microsystems) has classes that facilitate retrieving class and object level information from a running Java program. However, it does not retrieve statement level information from a method body, so it does not serve our purpose.
The Java virtual machine tool interface (Sun Microsystems), which replaces the Java Virtual Machine Profiler Interface (JVMPI) and the Java Virtual Machine Debug Interface (JVMDI), provides both a way to inspect the state and to control the execution of applications running in the Java Virtual Machine (JVM). This is a powerful technology and should be a choice for large scale visualization system which needs to display all system details, such as threads and object monitors. However, for our purpose it is a heavy choice in terms of learning and development effort.
Program instrumentation is a powerful technique in which extra code is inserted before or after every statement of interest in the target code. The inserted code, when executed, passes on information about the current state of the program to the visualization engine. The good thing about this approach is its flexibility. The amount of code to be inserted depends on the level of details we want from the running program. The instrumentation can be byte code based or source code based.
In byte code instrumentation, the source code remains unchanged and only the byte code is instrumented. It can be used even if the source code is not available. Many class libraries, such as ASM (OW2 Consortium), BCEL (Apache Software Foundation) and SERP (SERP), are available which support byte code instrumentation. In source code instrumentation, the source code is instrumented and then compiled. Jeliot (Bednarik et al., 2005) is a popular visualization tool which uses this technique.
Our approach to data gathering: We have decided to use program instrumentation approach for data gathering, because of its flexibility. However, our instrumentation is neither byte code based nor source code based. We use a hybrid approach in which the Java source code is converted to an equivalent and simple Intermediate Representation (IR). The IR is then instrumented and compiled.
We used SOOT (Vallee-Rai et al., 1999), a freely available Java class library and framework for instrumentation. SOOT is a powerful framework and its main focus is code optimization. However, it converts Java code to a very simple intermediate representation called Jimple (Vallee-Rai et al., 1999). The framework also allows transforming Jimple code to other Jimple code based on rules specified in transformers. Transformers are special classes that dictate how each statement, method or any other class component should be transformed to another form. Transformers thus take a set of Java classes (most probably in Jimple format) and transform them to another set of classes. One possible use of Transformers is to use them for code instrumentation. For example, we can specify that after each Assignment statement, code for a method-call is inserted. The method-call, when executed, informs the visualization engine that a particular variable has been changed and passes the new value of the variable. We follow this approach for the following reasons:
| • | Byte code based instrumentation needs too much effort because of its requirement to know class file format and byte code syntax. Also, the byte code does not have all the information that we need in our visualization system. For example, for each statement, we can only retrieve the source code line numbers, but we cannot find the column numbers within a line |
| • | Source code based instrumentation change the original source code which is not good for most users. The Jeliot (Bednarik et al., 2005) system keeps the source code and produces an Intermediate Representation (IR) which contains extra information needed for visualization. Their visualization engine uses the IR as a log file and produces visualization. The Jeliot IR is too detailed and not suitable for our purpose |
| • | The intermediate representation of jimple is very simple. It has only 15 types of statements, while at byte code level, we have to deal with around 200 different statements |
| • | Using the SOOT framework, instrumentation is easy and manageable. Out of the 15 different types of Jimple statements, we needed to focus only on few of them |
| • | SOOT automatically converts the Java source code to Jimple code and the Jimple code (after instrumentation) to Java byte code. So, we do not have to worry about compilation issues |
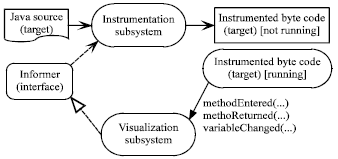
Program instrumentation design: Our system needs to be informed whenever a method is entered or exited, or a variable is changed in the target code. Figure 1 shows how the instrumentation subsystem works together with the visualization subsystem to visualize the target code. The figure reflects the following design decisions.
| • | A Java interface called Informer, declares a number of call-back methods, which will be called at proper times to inform the Visualization subsystem that something is changed in the running target code |
 | |
| Fig. 1: | Instrumentation and visualization subsystems |
| • | The visualization subsystem has a class called InformerClass, which implements the informer interface. This class contains code to produce proper visualization in response to the calling of any of its call-back methods. The call-back methods are called by the code instrumented in the target code |
| • | The Instrumentation subsystem reads the target Java source code and inserts instrumentation code at proper places in the Jimple representation of the target code. It works offline like a compiler. It knows about the methods of the Informer interface/class and inserts calls to these methods in the target code. When the instrumented byte code is running, it will interact with the Visualization subsystem because of the inserted method calls. In all the method calls, the name of the corresponding Java source code file and the line/column numbers of the statement that caused the change are passed as parameters. Specifically, the instrumentation subsystem inserts the followings in the Jimple code: |
| • | In the beginning of any method or constructor of the target code, a call to a method, named methodEntered, is inserted. The name of the method, the name of the class, parameters (names, types and values) and local variables (names and types) are passed as parameters in the method call. If the method is an instance method, then the reference to the object for which the method is being executed is also passed |
| • | Before any return statement, a call to a method, named methodReturning, is inserted. The name, class and other info of the method being returned are passed as parameters |
| • | After any assignment statement, a call to a method is inserted. The method to be called is chosen based on the type of Left Hand Side (LHS) of the assignment statement, i.e., whether the LHS is a local variable, instance variable, static variable or array element. The name, type and new value of the Left Hand Side (LHS) of the assignment statement are passed as parameters |
| • | Before any invoke (i.e., method-call) statement, a call to a method, named methodCall, is inserted |
Visualization subsystem: The visualization subsystem controls the execution of the target code. Initially, it opens a window with appropriate menu options. Users can open the target source code and can choose to run it (after instrumentation). The visualization subsystem locates the instrumented compiled target code and starts executing it. The call-backs from the instrumented code inform the visualization subsystem, which in turns produces the visualization. For rendering and user interaction with the visualized content, we used yFiles (yWorks), a powerful graph library. While, the target code is executed, the tool updates the visualization after each statement and allows users to step forward by pressing the step in button. Users can also interact with the visualization. For example, they can change the location of an object's box by simply dragging it to another location.
Visual representation of objects: The tool shows the target source code in the left panel and the visualization in the right. The top-left area of the visualization panel is reserved for the Method Call Stack. The remaining visualization area is used to show objects created by the target code. Each active method in the target code is represented by a box. The current method's box has a yellow background and is always in the front. Other methods, which are direct or indirect callers of the current method, have boxes with gray background and remain behind the current method's box.
In the method box, the method name is shown at the top, followed by parameters and local variables list. If a local variable represents a primitive value (such as an integer), the value is shown within the method box beside the name of the variable. If the variable represents an object reference, an arrow is shown from the variable name to the object, or a cross icon if the value is null.
Each object is represented as a box. The contents of the object box are customizable and user can control the details for each type of object. For example, for a linked list element object, users may choose to show only the data of the element without showing the next instance variable for the element. Instead the next can be represented as an arrow from the box to the next element object. By default, object boxes provide full detail of the object, i.e., all instance variable names and their values.
One of our objectives in developing the tool was that the visualization should be simple (not cluttered). To achieve this, we show pervasive objects as strings (by using the result of the toString method for the object) and all other objects with full detail, i.e., their instance variables names and values. The tool allows users to decide which objects are pervasive and which are not. By default, all objects created from Java or other class libraries are pervasive and objects created from user's classes are not pervasive. Another thing we do for avoiding clutter is that the tool chooses more compact visual representation for common data structures. For example, for a binary tree node, the tool shows the key value of the node in the middle of the node's box and the left and right references as arrows without any labels for these instance variables. Users can choose to skip this automatic compaction.
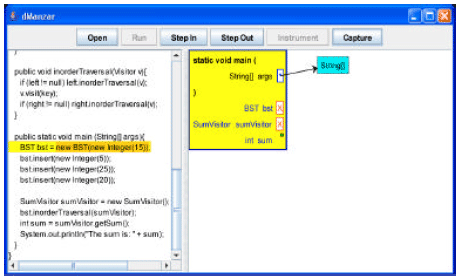
TOOL USAGE
Here, we demonstrate the usage of our data structure visualization tool dManzar. We use a simplified Binary Search Tree class (BST.java) that has insert and inorderTraversal instance methods. The main method creates a BST and inserts few data items in it. It then calls the inorderTraversal method to compute the numeric sum of all the keys in the BST. Following is the source code of the BST class.
Listing 1: BST.java |
 |
 |
We use a simplified visitor design pattern (Gamma et al., 1995), while traversing each node of the BST. Following is the source code of the visitor interface.
| Listing 2: Visitor.java |
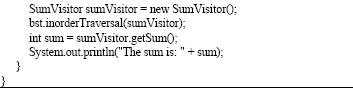
When the inorderTraversal method is called, an object of type visitor is passed in and the visit method of the object will be executed for each key in the BST. We use a SumVisitor class that implements the Visitor interface. The SumVisitor has a sum integer with zero as its initial value. Each call to the visit method will add the parameter value to the sum. Following is the source code of the SumVisitor class.
Listing 3: SumVisitor.java |
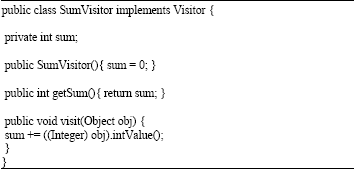 |
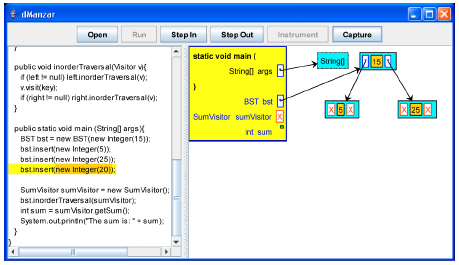
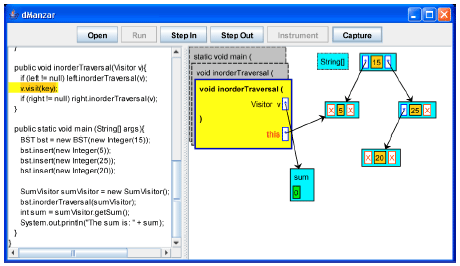
Figure 2-23 show our tool with BST source code being executed. The sequence of figures does not show all the screenshots. For brevity, around half of the screenshots are not shown here. Figure 2 shows that the main method is just entered and the BST constructor is going to be called. Figure 3 shows the BST constructor being executed.
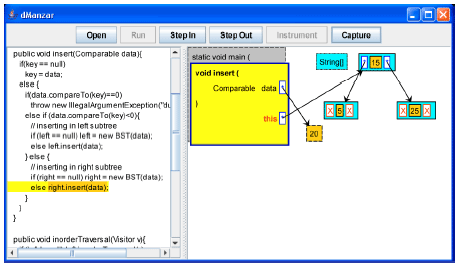
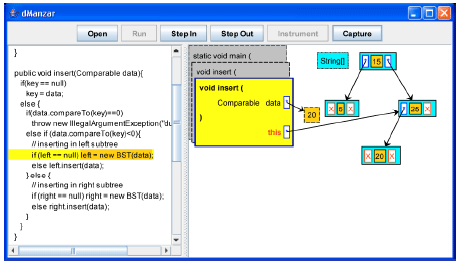
Figure 4 and 5 show the situation when the main method calls the insert method with datum 5. Figure 6 and 7 show the situation when the insert method is called with datum 25. Figure 8-10 show the situation when the insert method is called with datum 20. The Method Call Stack in Fig. 10 shows that the insert method is called twice recursively.
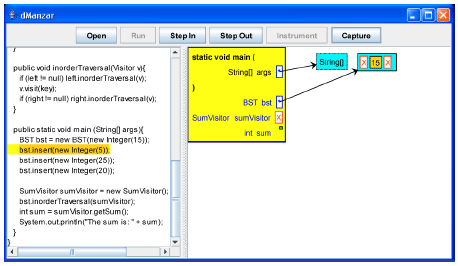
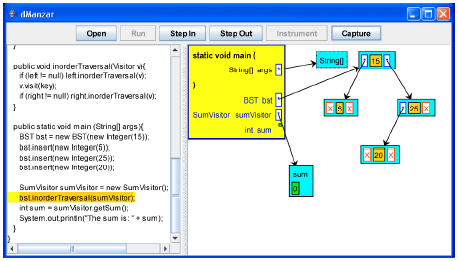
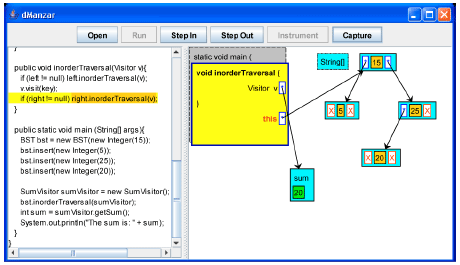
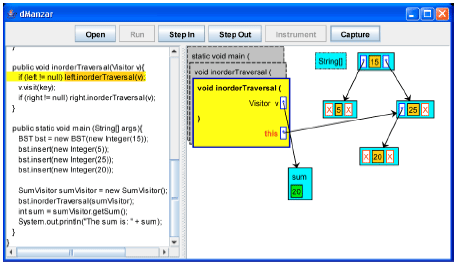
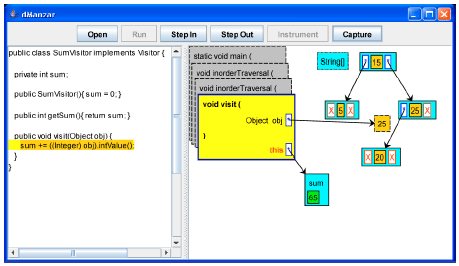
Next, the main method creates a SumVisitor object and calls the inorderTraversal method for the BST root (Fig. 11). The inorderTraversal method calls itself recursively for the left subtree (Fig. 12). Figure 13 shows that the visit method of the Visitor is being called for the node with key 5. Because left and right of the current node are null, the recursive calls will not get a chance to execute. The visit method adds the key value (5) to the sum (Fig. 14).
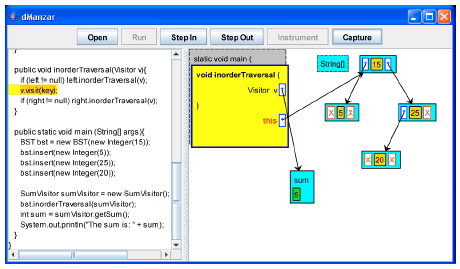
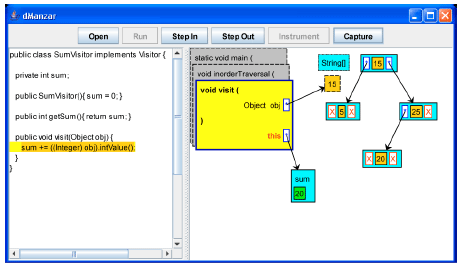
The method call stack in Fig. 15 shows that the inorderTraversal method for the root node is reached back and the visit method is going to be called for its key (15). The visit method adds the key value (15) to the sum (Fig. 16).
After the visit method is executed for the root node, the inorderTraversal method is called recursively for the right subtree (Fig. 17). The inorderTraversal method for the node with key 25 calls itself recursively for the left subtree (Fig. 18).
 | |
| Fig. 2: | The main method is just entered |
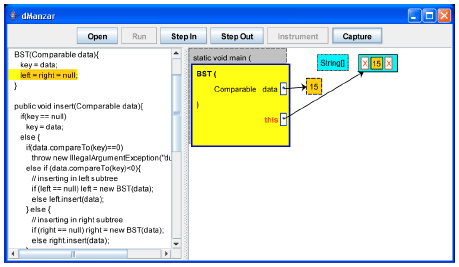 | |
| Fig. 3: | The BST constructor code is executed |
 | |
| Fig. 4: | The insert method is going to be called with datum 5 |
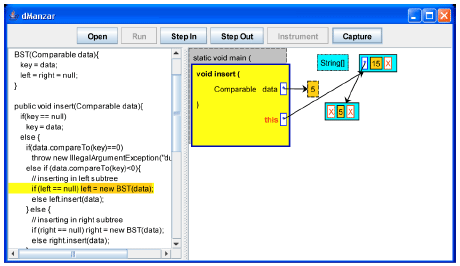 | |
| Fig. 5: | Key 5 is inserted to the left of the current BST node |
 | |
| Fig. 6: | The insert method is going to be called with datum 25 |
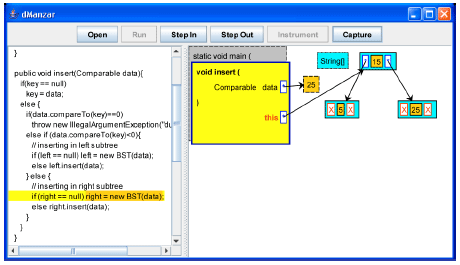 | |
| Fig. 7: | Key 25 is inserted to the right of the current BST node |
 | |
| Fig. 8: | The insert method is going to be called with datum 20 |
 | |
| Fig. 9: | The insert method is going to call itself recursively for the right subtree |
 | |
| Fig. 10: | Key 20 is inserted to the left of the node with key 25 |
 | |
| Fig. 11: | A SumVisitor object is created and the inorderTraversal method is going to be called for the root of the BST |
 | |
| Fig. 12: | The inorderTraversal method for the root node is going to call itself recursively for the left subtree |
 | |
| Fig. 13: | The inorderTraversal method calls the visit method and passes the current key (5) as parameter |
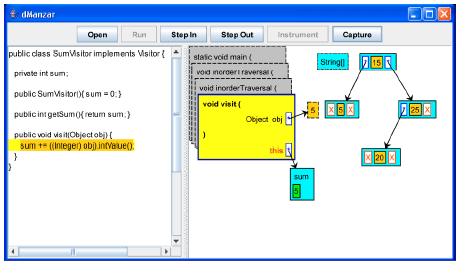 | |
| Fig. 14: | The visit method is executed for key 5 and the value is added to sum |
 | |
| Fig. 15: | The visit method is going to be called for the node with key 15 |
 | |
| Fig. 16: | Key 15 is added to the sum |
 | |
| Fig. 17: | The inorderTraversal method for the root node is going to call itself recursively for the right subtree |
 | |
| Fig. 18: | The inorderTraversal method for the node with key 25 is going to call itself recursively for the left subtree |
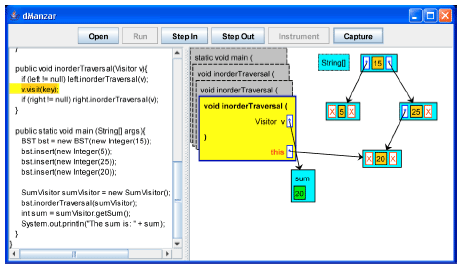 | |
| Fig. 19: | Key 20 is going to be visited |
 | |
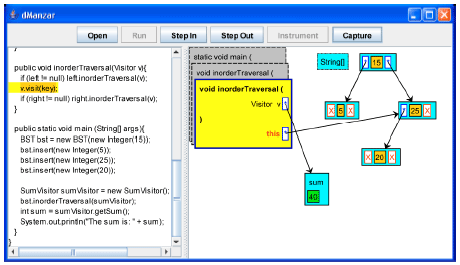
| Fig. 20: | Key 20 is visited and added to sum |
 | |
| Fig. 21: | Key 25 is going to be visited |
 | |
| Fig. 22: | Key 25 is visited and added to sum |
 | |
| Fig. 23: | The getSum method has returned the sum value |
The left and right of the node with key 20 are null, so no recursive call will be made. The visit method will be executed for the current node (Fig. 19). The visit method adds the key value (20) to the sum (Fig. 20).
After the visit and inorderTraversal method are executed for the node with key 20, control comes back to the inorderTraversal method for the node with key 25. Now, the visit method is going to be called for the key value 25 (Fig. 21). The visit method adds the key value (25) to the sum (Fig. 22).
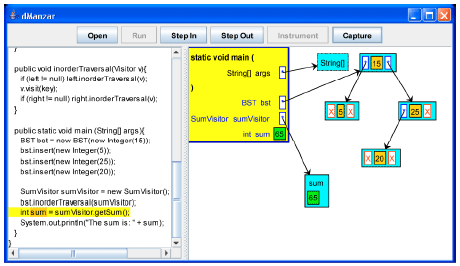
Control goes back to the main method, where the getSum method is called for the sumVisitor to return the sum value and print it (Fig. 23).
DISCUSSION
Animal (Roling and Freisleben, 2001) is an interactive system for building visualizations and animations. It is an open tool, meaning that there are no data structures and algorithms predefined by the system; instead, the tool supplies graphics primitives that are useful in creating such visualization. Although, Animal is very easy to use, because of its intuitive drag-and-drop interface, the amount of time required to create a visualization is quite large. While it does supply primitives that facilitate the creation of algorithm animations, we could not see that teachers and students would find these sufficiently more powerful than those available in a generic tool like PowerPoint, with which they are very familiar.
Matrix (Korhonen, 2003) is a system for visualizing data structures and algorithms, primarily, advanced tree and graph algorithms. It is closed, meaning that there is a fixed set of structures and algorithms supported by the system. Matrix uses step-by-step animation, though it can export the animation in the Scalable Vector Graphics (SVG) format and these animations are smooth. The control of the visualization is good and animations can be saved and reloaded. Of particular importance is the ability of Matrix to read external files of data so that the teacher can easily prepare different demonstrations and exercises for a particular algorithm. The most serious problem with Matrix is that there is no display of source code nor is there any coordination with explanatory material. It is also difficult to extend it to visualize new algorithms. Such an extension, which is said to be possible, would require significant Java programming experience.
SICAS (Marcelino et al., 2004; Ben-Ari, 2001) is a computer-tool designed to help learn the basic mechanisms of programming. It is language independent and oriented to the design and implementation of algorithms. It is an environment that encourages students to develop their capacities through experimentation, allowing them to design, observe, analyze, simulate and correct algorithms. We believe that this kind of approach can improve student problem solving capacities, but is not suitable to help students understand data structures and the related algorithms implemented in a language like Java.
OOP-Anim (Esteves and Mendes, 2004) shares the same pedagogical roots of SICAS. It is also an animation based simulation tool designed to allow students to create their programs, simulate them, see how they work and correct them if necessary. It accepts small Java programs as input and simulates them, allowing the student to visualize each instruction's effect, namely in terms of the classes, objects, references and messages included in the program. However, OOP-Anim focuses on helping students understand the general programming constructs like classes, objects and references only. It is not tailored towards data structures.
BlueJ (Kolling et al., 2003) is a tool which visualizes Java objects and classes to help new OO programmers to understand small Java programs and OO concepts. Its focus is on teaching Java rather than data structures and algorithms.
Jeliot (Bednarik et al., 2005) is a visualization tool that is meant to be used by students who are learning introductory programming in Java Language. It provides a window for adding/editing code and then shows all the objects and references graphically as they are created or assigned. This is a very powerful general purpose tool for visualization of algorithms and understanding of object life cycles. We evaluated this tool to check if it will help us demonstrate simple data structures or design patterns. We implemented a basic linked-list and inserted the code in Jeliot. The tool was able to generate linked-list functionality graphically and we were able to visualize the workings of a linked-list. The problem that we faced was that the animations were too detailed since this is a general purpose visualizer and although suitable for an advanced user, novice users (students) will not be able to benefit much from this.
LJV (Hamer, 2004a, b) is a Java class that can be included in a student's program. It provides a method drawGraph that creates a drawing of any Java object. The drawing is visualized with the GraphViz utility (Graph Visualization Software). Although it requires intervention in the source program, the intervention is very simple. The primary advantage of LJV is that it enables visualization of any student-written program, which we believe to be of great importance. It does not provide step-by-step visualization. The drawings, which represent objects' structures, have to be seen by another graphics viewing tool.
CONCLUSIONS
Students of data structure course need tool support to help them understand the abstractions implied by object-oriented programming and design patterns. The requirements, design and implementation of such a tool are presented. By using the tool, students can visually see the effects of their code. The tool can visualize code with semantic errors, thus helping students to know their mistakes.
REFERENCES
- Hamer, J., 2004. Visualising Java data structures as graphs. Proceedings of the 6th Conference on Australasian Computing Education, Dunedin, New Zealand, Jan. 15, Australian Computer Society Inc., Darlinghurst, Australia, pp: 19-26.
Direct Link - Kolling, M., B. Quig, A. Patterson and J. Rosenberg, 2003. The BlueJ system and its pedagogy. J. Comput. Sci. Educ. Special Iss. Learning Teaching Object Technol., 13: 249-268.
Direct Link - Roling, G. and B. Freisleben, 2001. AnimalScript: An extensible scripting language for algorithm animation. SIGCSE Bull., 33: 70-74.
Direct Link - Marcelino, M., A. Gomes, N. Dimitrov and A. Mendes, 2004. Using a computer-based interactive system for the development of basic algorithmic and programming skills. Proceedings of the International Conference on Computer Systems and Technologies, June 17-18, Bulgaria, pp: 1-6.
Direct Link